
What is Conduktor?
Conduktor is a native desktop application that is a graphical user interface for your Apache Kafka environment and supports the full Kafka ecosystem including Schema Registry, Kafka Connect, Kafka Streams, and ksqlDB.
If you use Apache Kafka, Conduktor will increase productivity, reduce costs and ultimately, accelerate delivery of your critical data streaming projects. Download Conduktor now
What is Kafka Connect?
Kafka Connect is a tool in the Apache Kafka ecosystem which allows users to integrate their data sources between Apache Kafka and other data systems in a reliable way.
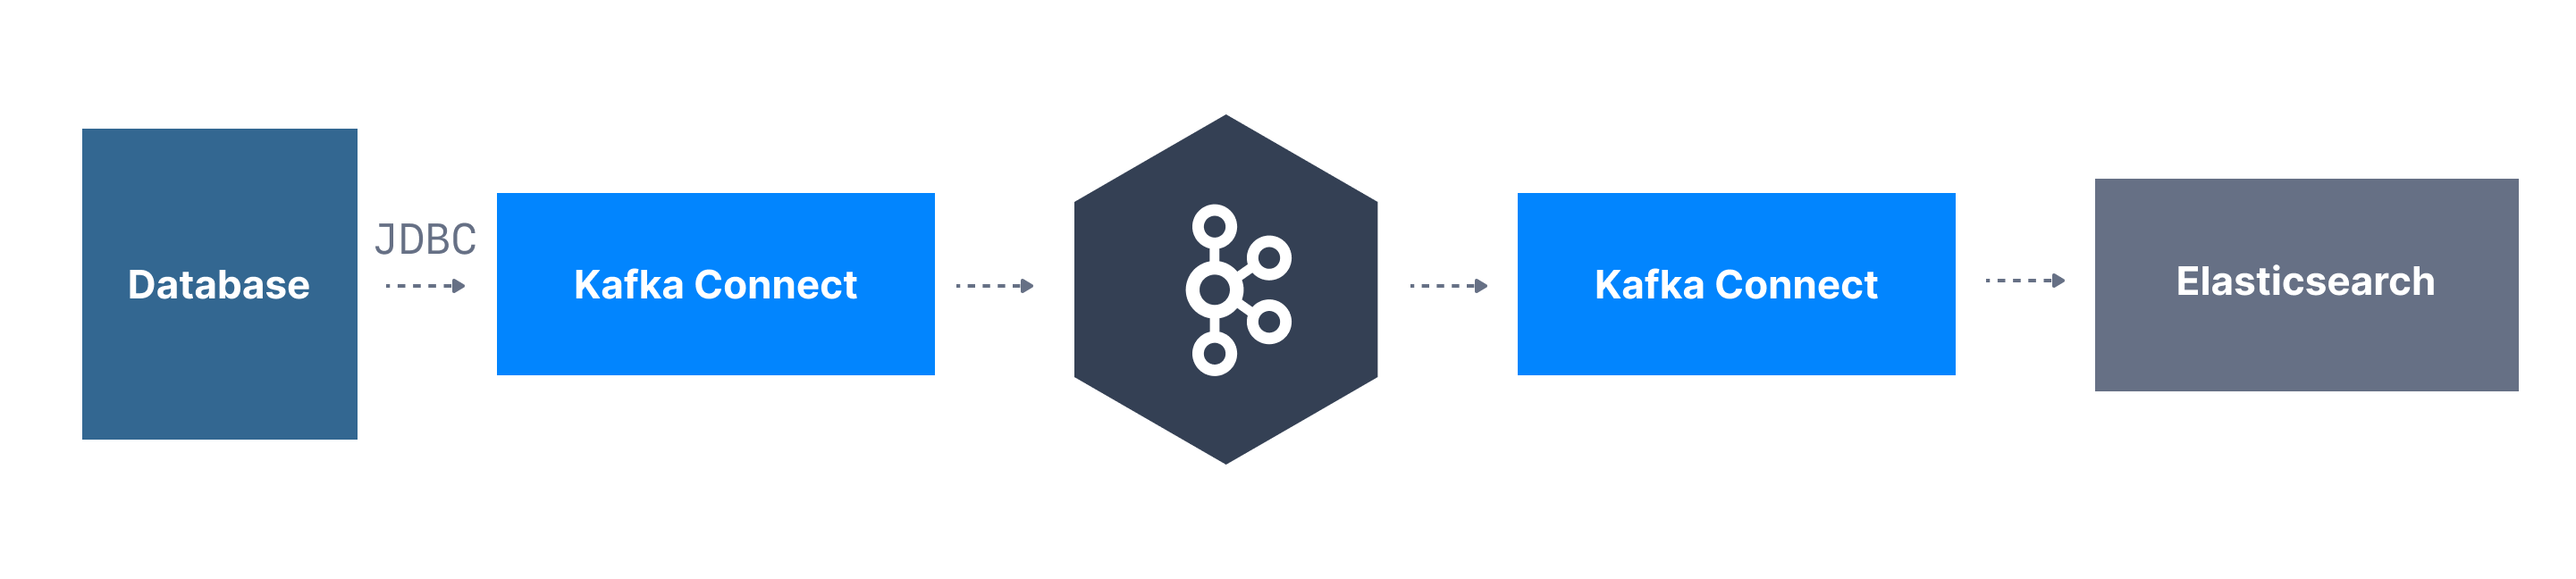
Kafka Connect makes it easy to quickly start a connector and integrate real-time data either into Kafka from a source connector or out of Kafka into a sink connector of some kind. You can learn more about Kafka connect and its uses cases in this blog post by Stephane Derosiaux

What is Debezium?
Debezium is essentially a modern, distributed open source change data capture (CDC) platform that supports the monitoring of a number of database systems.
Debezium is built on top of Apache Kafka and provides Kafka Connect compatible connectors that monitor specific database management systems. It turns your existing databases into event streams, so applications can see and respond immediately to each row-level change in the databases.
Debezium records the history of data changes in Kafka logs, from where your application consumes them. This makes it possible for your application to easily consume all of the events correctly and completely. Even if your application stops unexpectedly, it will not miss anything: when the application restarts, it will resume consuming the events where it left off. As the data in the database changes, you will see the resulting change in an event stream.
Why Debezium?
Thanks to Kafka Connect and Debezium, change data capture, or CDC is now a common pattern that allows you to expose database changes as events into Kafka. As your database has a change occur you can track that directly in Kafka.
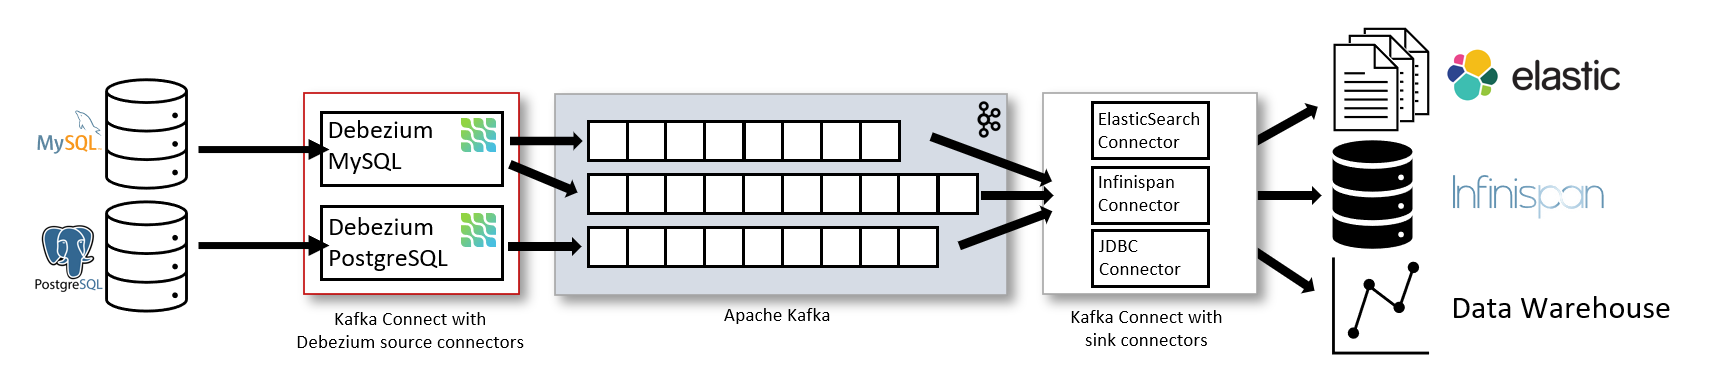
As illustrated in figure 2, one method of achieving this is by capturing the changelogs of a database upstream in either a Postgres or MySql database using the Debezium Kafka connectors. The changelog itself can be stored in Kafka, where a series of deployed programs are able to transform, aggregate, and join the data together. The processed data can then be streamed out to a sink database such as ElasticSearch or a data warehouse.
Debezium Use Cases
According to Gunnar Morling from Redhat, tech lead for Debezium, CDC means "liberation for your data". He goes into more detail on the plans for Debezium going forward in this talk.
Ultimately, Debezium lets you track data changes, replicate data, update caches, sync data between microservices, and create audit logs among much more.
Tutorial
As an example, we are going to look at utilizing Debezium in Conduktor and accomplishing this with Docker. We will carry out the following four steps.
Step 1: Start Apache Kafka, Kafka Connect, and Debezium with Docker
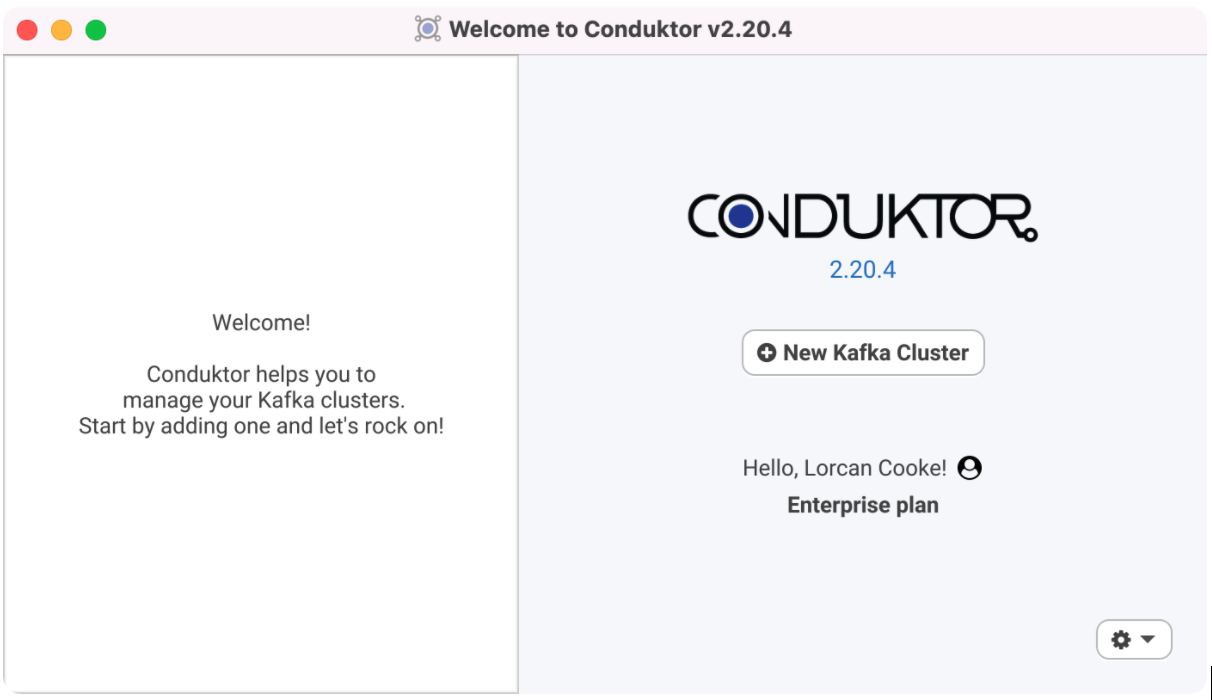
Step 2: Open Conduktor
Step 3: Add MYSQL Debezium connector in Conduktor
Step 4: View all created topics in Conduktor
Prerequisites
Before we can carry out the above we need to have some prerequisites completed as shown below.
Docker is installed and running. This tutorial uses Docker. For more information, see
the Docker Engine installation documentation
.
Java 11+ installed. You can download it from
Apache Kafka installed. You can download Kafka from
.
Conduktor is installed and running. You can follow
to get started.
For a helpful video on installing conduktor, Docker, and other prerequisites please see this from one of our founders Stephane Maarek. Starting a local Apache Kafka Cluster on Conduktor in 3 minutes using Docker
Step 1: Start Apache Kafka, Kafka Connect, and Debezium with Docker
We want to use the docker-compose file below to start:
A Kafka broker instance
A Zookeeper instance
A Kafka Connect instance
A Mysql server
A Debezium connector for Mysql
i) Download the YAML file
To do this we will download the YAML file below and save it as docker-compose.yml.
YAML file
1---
2version: '2'
3
4services:
5  zookeeper:
6    image: confluentinc/cp-zookeeper:6.0.0
7    hostname: zookeeper
8    container_name: zookeeper
9    ports:
10      - "2181:2181"
11    environment:
12      ZOOKEEPER_CLIENT_PORT: 2181
13      ZOOKEEPER_TICK_TIME: 2000
14
15  broker:
16    image: confluentinc/cp-kafka:6.0.0
17    hostname: broker
18    container_name: broker
19    depends_on:
20      - zookeeper
21    ports:
22      - "29092:29092"
23      - "9999:9999"
24    environment:
25      KAFKA_BROKER_ID: 1
26      KAFKA_ZOOKEEPER_CONNECT: 'zookeeper:2181'
27      KAFKA_LISTENER_SECURITY_PROTOCOL_MAP: PLAINTEXT:PLAINTEXT,PLAINTEXT_HOST:PLAINTEXT
28      KAFKA_ADVERTISED_LISTENERS: PLAINTEXT://broker:9092,PLAINTEXT_HOST://localhost:29092
29      KAFKA_OFFSETS_TOPIC_REPLICATION_FACTOR: 1
30      KAFKA_TRANSACTION_STATE_LOG_MIN_ISR: 1
31      KAFKA_TRANSACTION_STATE_LOG_REPLICATION_FACTOR: 1
32      KAFKA_GROUP_INITIAL_REBALANCE_DELAY_MS: 0
33      KAFKA_JMX_PORT: 9999
34      KAFKA_JMX_HOSTNAME: localhost
35
36  connect:
37    image: confluentinc/cp-kafka-connect:latest
38    hostname: connect
39    container_name: connect
40    depends_on:
41      - broker
42    ports:
43      - "8083:8083"
44    command:
45      - bash
46      - -c
47      - |
48        confluent-hub install --no-prompt confluentinc/kafka-connect-jdbc:latest
49        confluent-hub install --no-prompt confluentinc/kafka-connect-datagen:latest
50        confluent-hub install --no-prompt debezium/debezium-connector-mysql:latest
51        /etc/confluent/docker/run
52    environment:
53      CONNECT_BOOTSTRAP_SERVERS: "broker:9092"
54      CONNECT_REST_ADVERTISED_HOST_NAME: connect
55      CONNECT_REST_PORT: 8083
56      CONNECT_GROUP_ID: compose-connect-group
57      CONNECT_CONFIG_STORAGE_TOPIC: docker-connect-configs
58      CONNECT_CONFIG_STORAGE_REPLICATION_FACTOR: 1
59      CONNECT_OFFSET_FLUSH_INTERVAL_MS: 10000
60      CONNECT_OFFSET_STORAGE_TOPIC: docker-connect-offsets
61      CONNECT_OFFSET_STORAGE_REPLICATION_FACTOR: 1
62      CONNECT_STATUS_STORAGE_TOPIC: docker-connect-status
63      CONNECT_STATUS_STORAGE_REPLICATION_FACTOR: 1
64      CONNECT_KEY_CONVERTER: org.apache.kafka.connect.storage.StringConverter
65      CONNECT_VALUE_CONVERTER: org.apache.kafka.connect.json.JsonConverter
66      CONNECT_PLUGIN_PATH: "/usr/share/java,/usr/share/confluent-hub-components"
67      CONNECT_LOG4J_LOGGERS: org.apache.zookeeper=ERROR,org.I0Itec.zkclient=ERROR,org.reflections=ERROR
68      KAFKA_JMX_OPTS: -Dcom.sun.management.jmxremote=true -Dcom.sun.management.jmxremote.authenticate=false -Dcom.sun.management.jmxremote.ssl=false -Djava.rmi.server.hostname=connect -Dcom.sun.management.jmxremote.local.only=false -Dcom.sun.management.jmxremote.rmi.port=5555 -Dcom.sun.management.jmxremote.port=5555
69
70  mysql:
71    image: debezium/example-mysql:1.7
72    hostname: mysql
73    container_name: mysql
74    depends_on:
75      - broker
76    environment:
77      - MYSQL_ROOT_PASSWORD=debezium
78      - MYSQL_USER=mysqluser
79      - MYSQL_PASSWORD=mysqlpw
80    ports:
81      - '3306:3306'
ii) Run docker compose
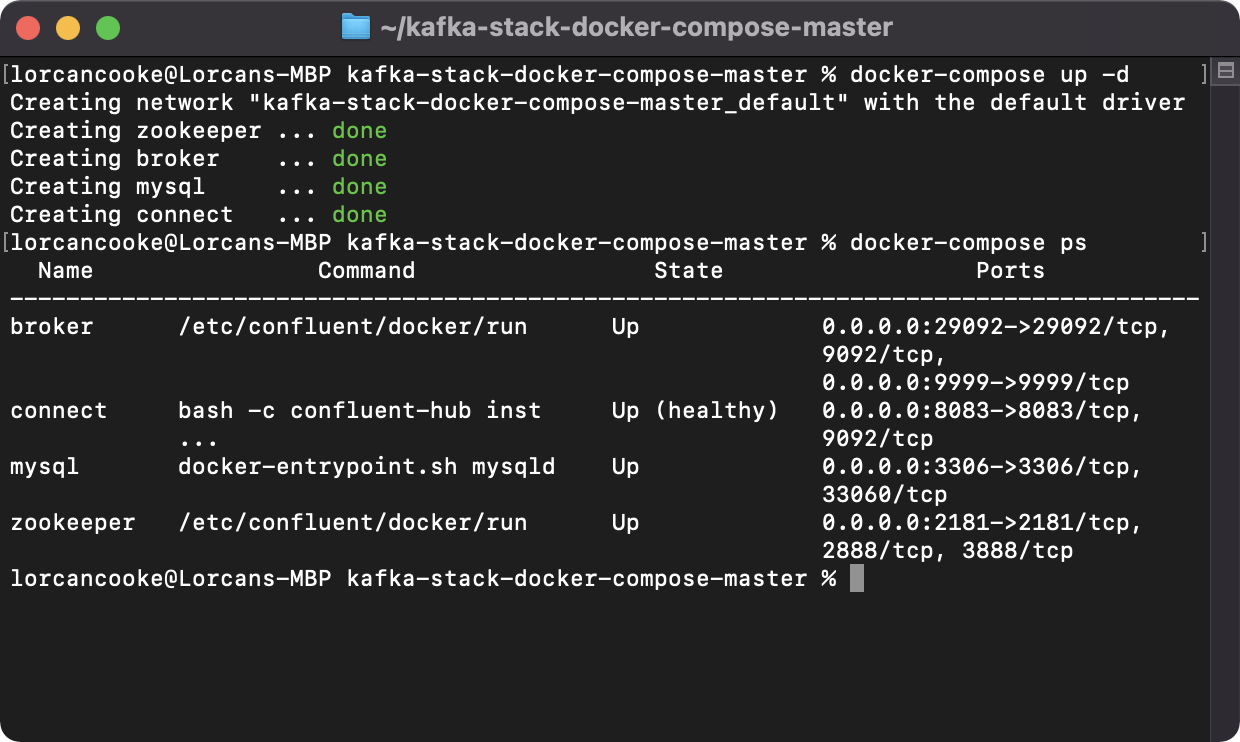
After saving the above YAML file as docker-compose.yml, open your command line interface or terminal and run the following command:
_docker-compose up -d_

iii) Check its running
We will just check that everything is up and running on docker we will enter the following command:
_Docker-compose ps_
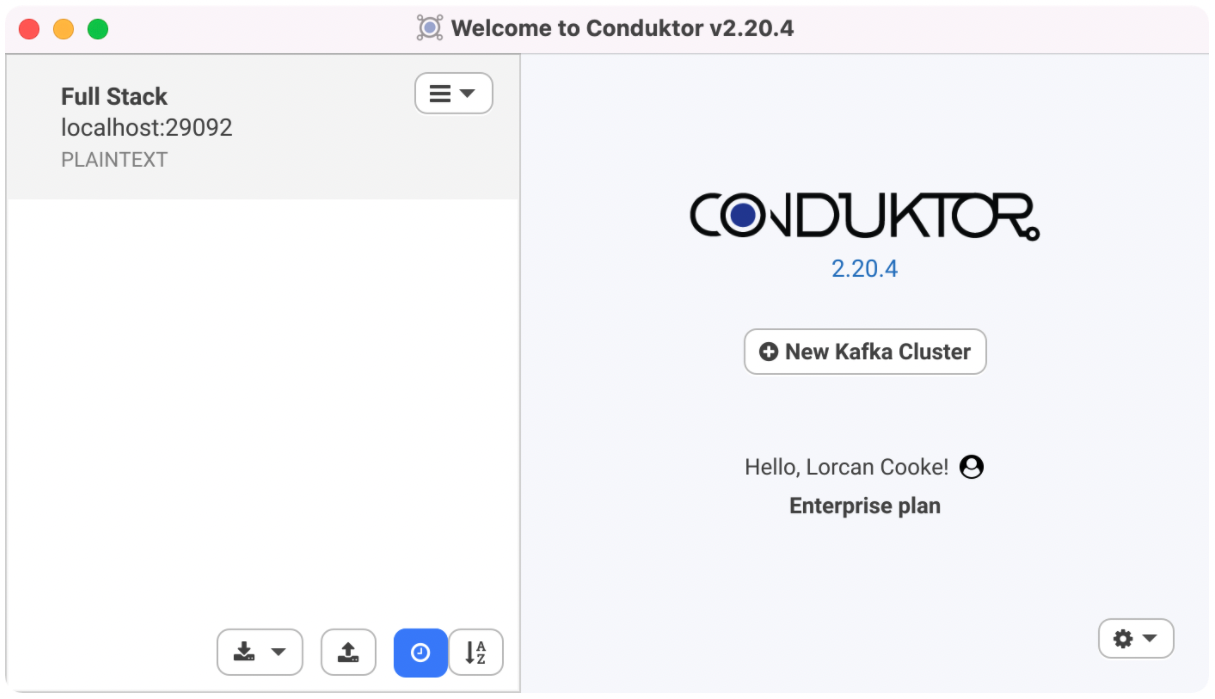
Step 2: Opening Conduktor
Moving to the next step we will open up Conduktor and configure the cluster from our Docker compose file.
i) Open Conduktor and sign in
ii) Configuring your Kafka Cluster
Enter the bootstrap server for the Kafka cluster as localhost:29092 as specified in the YAML file. The cluster name can be anything.
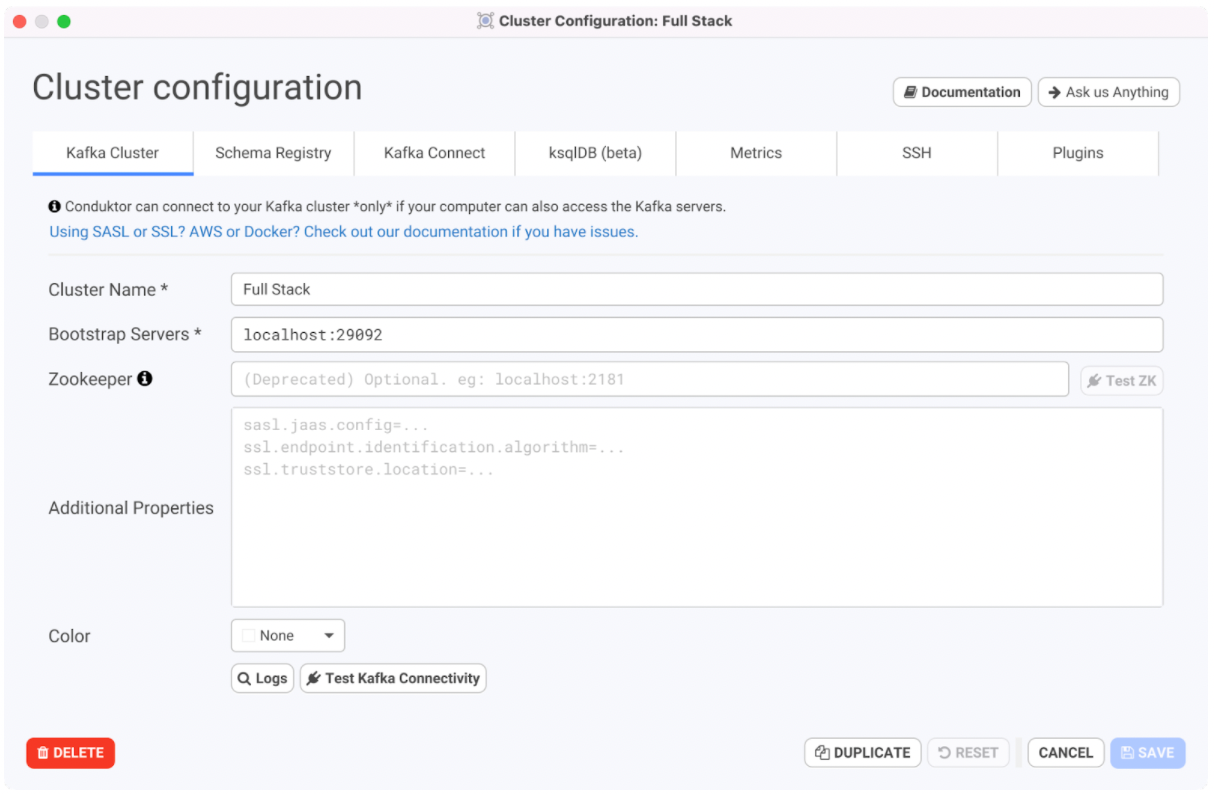
Next, enter the URL for the instance of Kafka connect as http://localhost:8083 as specified in the YAML file.
Click on the Save button to save the cluster configuration.
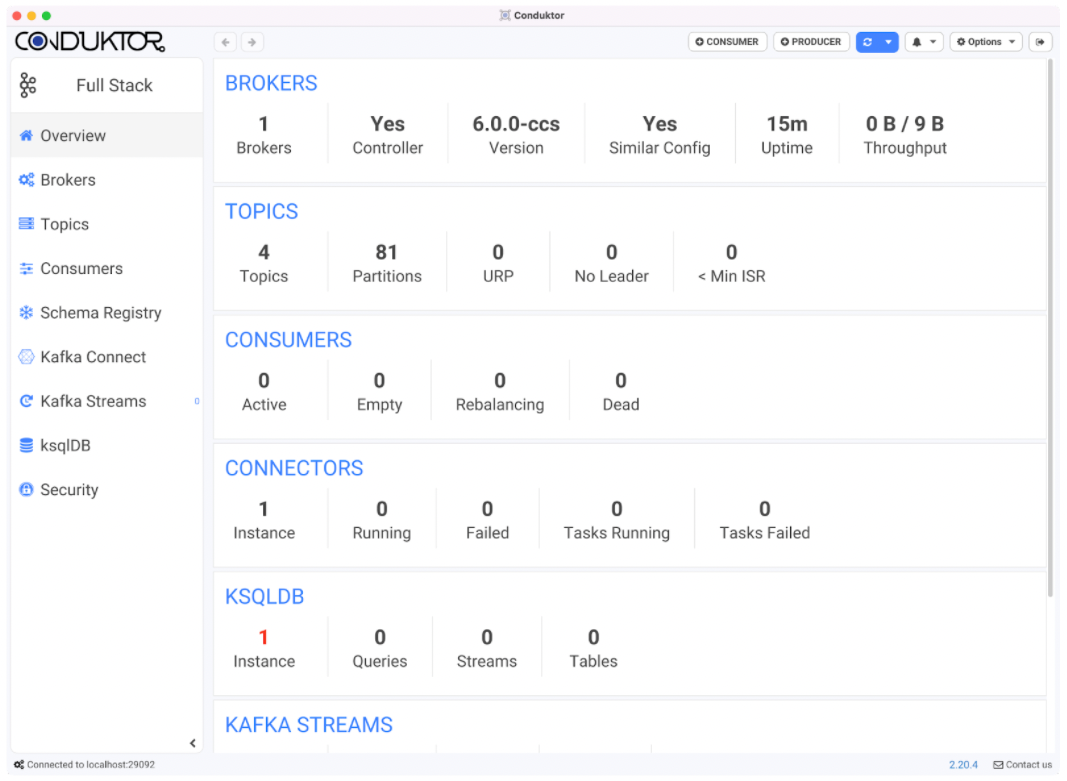
Then click on the cluster itself to connect.
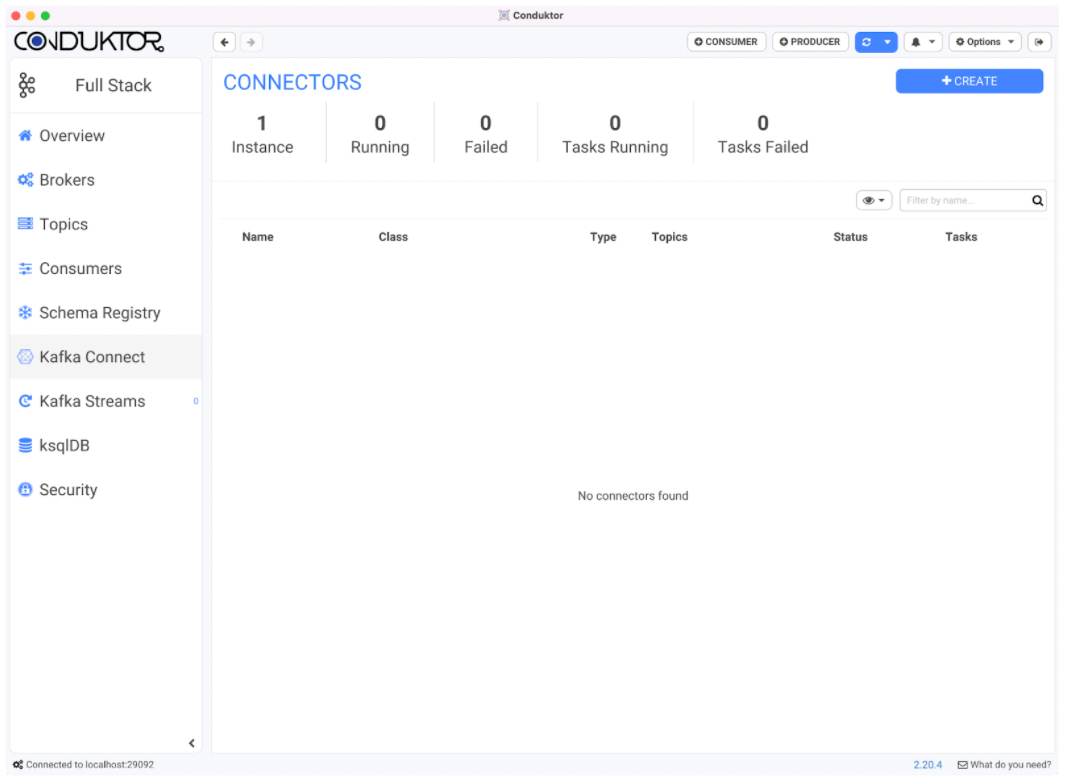
You will come to the Overview tab inside Conduktor with a view similar to below
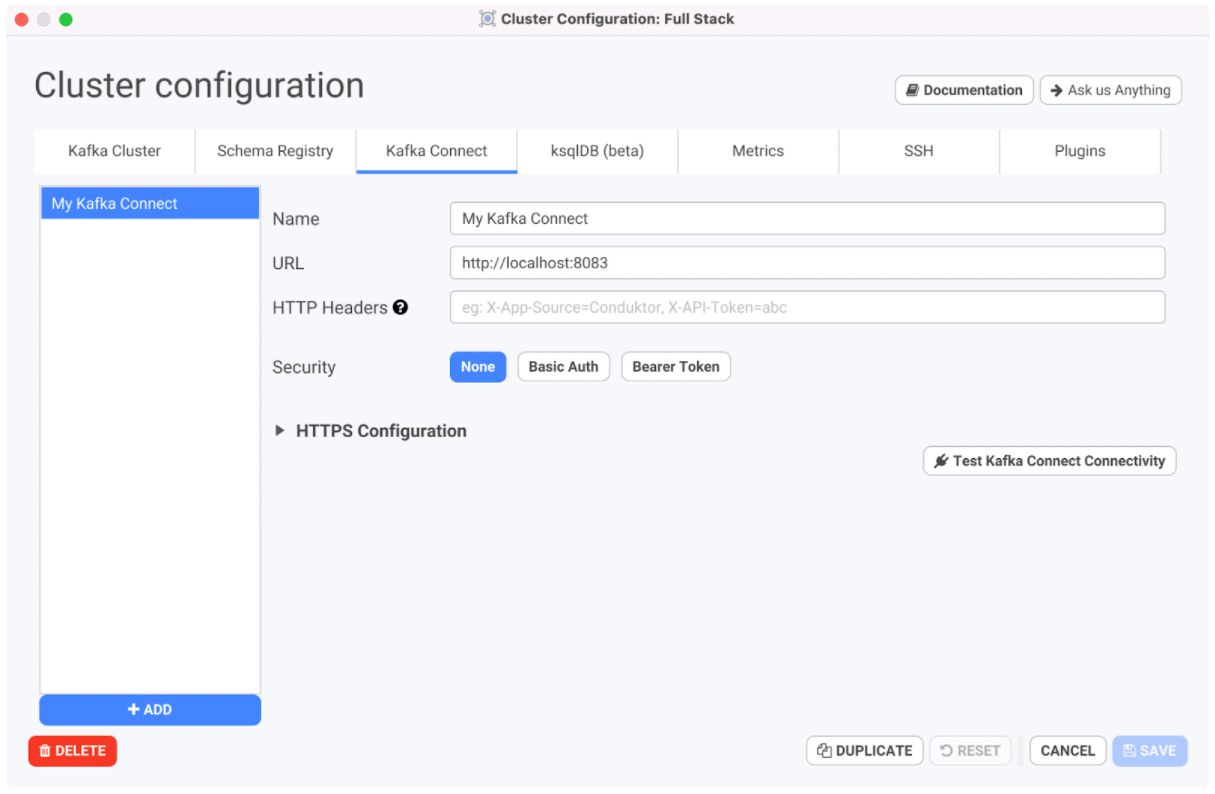
Step 3: Adding a Debezium Connector for Kafka Connect in Conduktor
i) Kafka Connect Tab
After configuring our cluster we want to add our Debezium connector in Conduktor.
To do this we will go to the Kafka Connect tab as shown below.
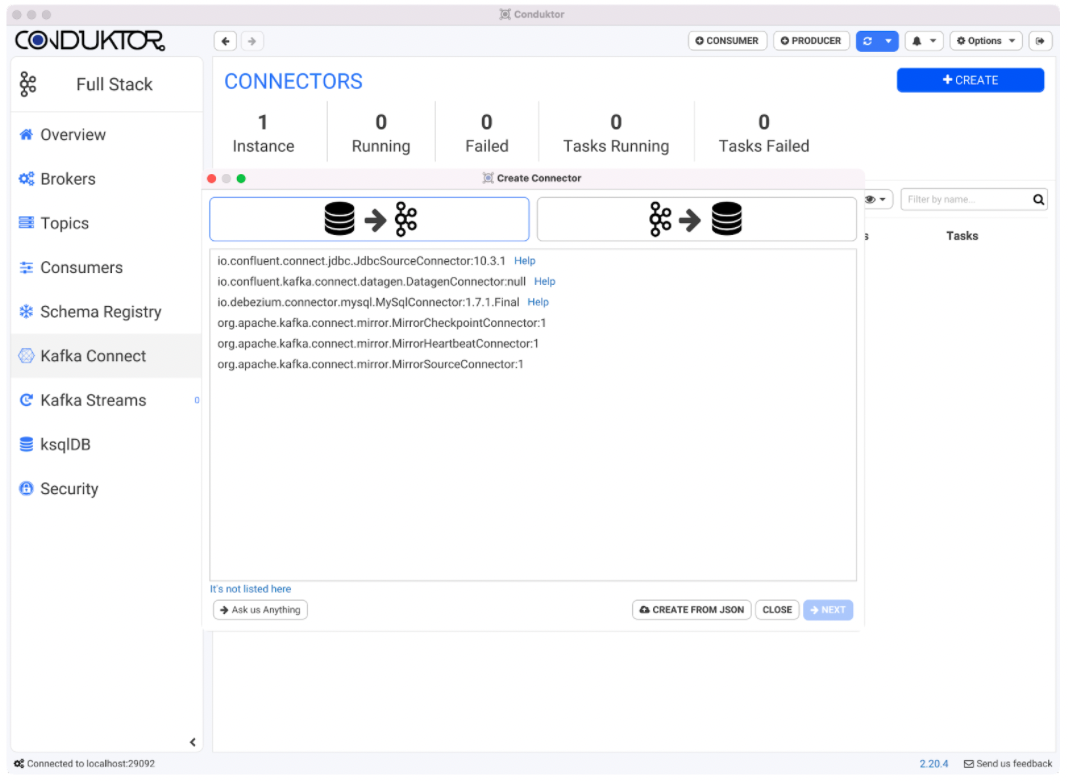
ii) Creating a connector in Conduktor
We now have two options to add a connector we can
Option 1:Using the connect configuration wizard in Conduktor
Option 2: Import the connector in JSON format directly
Option 1: Using the connect configuration wizard we will click on io.debezium.connector.mysql.MySqlConnector:1.7.1.Final and enter the information required in each of the connector wizard tabs.
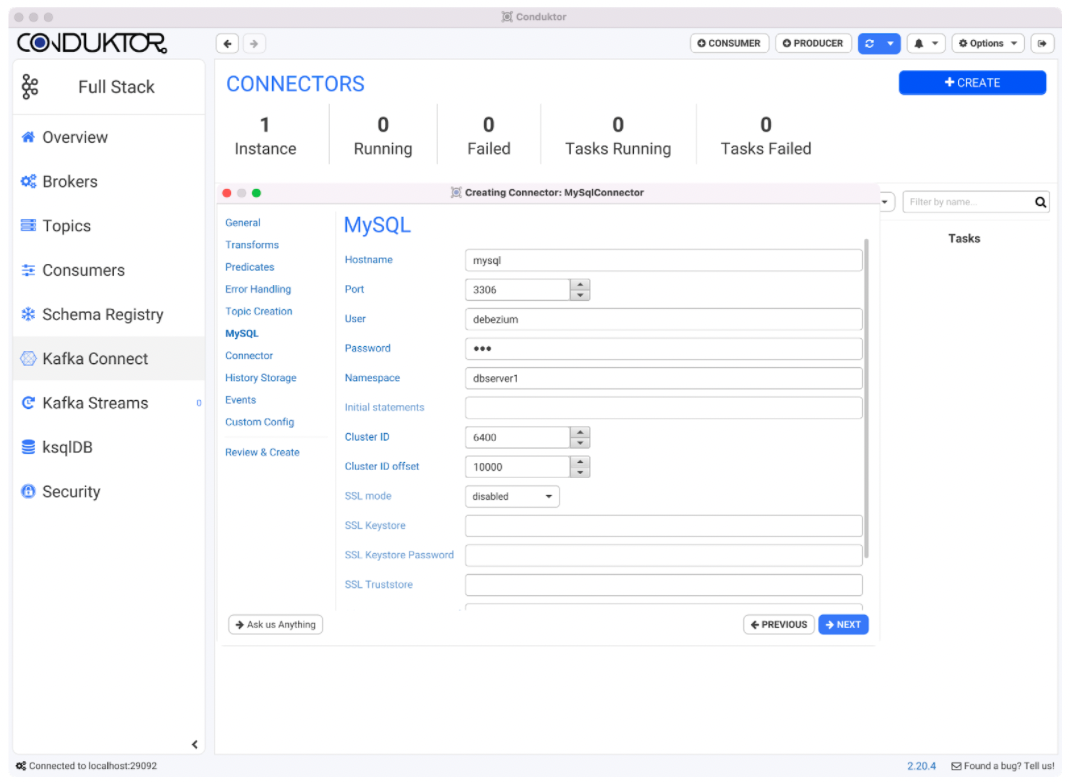
Leave the default values for wizard tabs, including Transforms, Predicates, Error Handling, and Topic Creation. When the MySQL tab shows up, provide the following information.
Field | Value |
|---|---|
Hostname | mysql |
Port | 3306 |
User | debezium |
Password | dbz |
Namespace | dbserver1 |
In the History Storage tab, enter the following information.
Field | Value |
|---|---|
Kafka broker addresses | broker:9092 |
Database history topic name | schema-changes.inventory |
Leave Events and Custom Config tabs with the defaults. Finally, review the connector configurations before applying them to the cluster.
Option 2: Using the connector configuration in JSON format, we will copy and paste it directly into Conduktor. From this screen onwards, continue the wizard with the default values in the tabs.
1{
2  "name": "inventory-connector",
3  "config": {
4    "connector.class": "io.debezium.connector.mysql.MySqlConnector",
5    "tasks.max": "1",
6    "database.hostname": "mysql",
7    "database.port": "3306",
8    "database.user": "debezium",
9    "database.password": "dbz",
10    "database.server.id": "6400",
11    "database.server.name": "dbserver1",
12    "database.include.list": "inventory",
13    "database.history.kafka.bootstrap.servers": "broker:9092",
14    "database.history.kafka.topic": "schema-changes.inventory"
15  }
16}
iii) View Connector running
We can now see our Debezium MySql connector with its current status and all topics. Initially, it might take a few seconds for the topics to get created. Step 4: View all created topics in Conduktor
Open the Topics tab in Conduktor to see all of the newly created topics that will show the change data capture as part of the debezium connector. After we have added the Debezium MySQL connector in Conduktor we can see it starts monitoring the database for data change events, in this case, it is a database for inventory with specific topics related to different tables.
The events are written to the following topics with the dbserver1 prefix (the name of the connector):
dbserver1:
The schema change topic to which all of the Data definition language (DDL) statements are written.
dbserver1.inventory.products:
Captures change events for the products table in the inventory database.
dbserver1.inventory.products_on_hand:
Captures change events for the products_on_hand table in the inventory database.
dbserver1.inventory.customers:
Captures change events for the customers table in the inventory database.
dbserver1.inventory.orders:
Captures change events for the orders table in the inventory database.
We can also look further into one of the topics by opening a consumer directly in Conduktor. For this example, we will explore the dbserver1.inventory.addresses topic.
To do this click on “Consumer” on the top right corner to create a new consumer. In the top left corner of this tab click on “Pick a Topic to inspect its data” and then choose db.server1.inventory.addresses.
We will then choose “Start from The Beginning” and click on “Start” on the bottom right. This will show the different types of change events associated with addresses as follows.
Conclusion
We have now run an Apache Kafka broker, a Zookeeper broker, Kafka Connect, MySql, and Debezium through docker and created a debezium connector directly through Conduktor and seen the changes illustrated in a consumer.
As shown in this tutorial Conduktor makes it easier for you to manage your instances of Kafka Connect, add and edit them and when using Debezium you can keep track of all topics involved very easily and quickly and filter by time/date or offset.
References
We aim to accelerate Kafka projects delivery by making developers and organizations more efficient with Kafka.